08/29/2025
Decor

DIY Abstract Architecture Planter: Two Easy Methods

  • July 15, 2024
  • 0

During quarantine, my love for plants only grew stronger. With fewer opportunities to spend money on dining out and entertainment, I found myself investing more in home projects
DIY Abstract Architecture Planter: Two Easy Methods

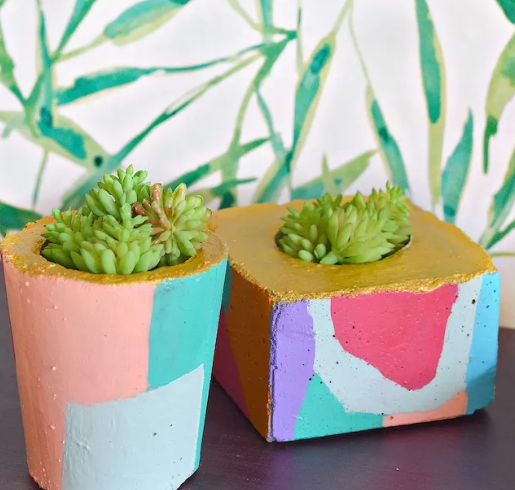
During quarantine, my love for plants only grew stronger. With fewer opportunities to spend money on dining out and entertainment, I found myself investing more in home projects and adding new plants to my collection. One thing that had been bothering me for a while was the plain, boring planters I had around the house. I wanted to give them a fresh look and was drawn to the abstract architectural outline style. A wraparound design seemed perfect for planters, allowing you to admire your plants from every angle!

I couldn’t wait to use my Cricut Joy for this project, as it made creating the design so much easier. But not everyone has access to a Cricut, so I decided to share two ways you can recreate this look: 1) with a vinyl cutter (like Cricut), or 2) by hand-painting the design. Both methods have their pros and cons, but I’m here to make sure these DIYs are approachable for everyone. Let’s dive in!

What You’ll Need:

For the Cricut Method:

  • Blank planter
  • Permanent vinyl
  • Transfer tape
  • Cricut Joy
  • Cut file (or you can create your own)

For the Hand-Painting Method:

  • Chalk or pencil for drawing
  • Paint (acrylic or your preferred paint type)
  • Paintbrush

If You Have a Cricut Joy:

  1. Upload the Design
    Start by uploading the cut file to Cricut Design Space. If you’re using the linked planter, set the width of the design file to 14.5 inches. If you’re working with a different planter, you can adjust the design in a vector program to fit your planter’s size.
  2. Cut the Vinyl
    Load your permanent vinyl into the Cricut machine and follow the on-screen instructions to cut the design. Once it’s done, unload the vinyl.
  3. Applying Vinyl to a Curved Planter
    The transfer tape gridlines are incredibly helpful here! Begin by carefully peeling the vinyl design away from the background. Then, apply the transfer tape over the vinyl, ensuring no air bubbles form.
  4. Start Applying the Vinyl
    For a smooth application on a curved surface, begin by aligning one end of the design just below the edge of the planter. Press the design in place while gently smoothing it out around the curve. As you work your way around the planter, peel the transfer tape off bit by bit and trim it away as needed. Be sure to pull the vinyl gently towards the bottom to ensure it stays aligned. Once you have the design in place, press it down firmly with your fingers. Note: Vinyl bubbles if moisture gets trapped beneath it. This method works best on drought-tolerant plants like cacti or on glazed planters that seal in moisture.

If You Want to Paint Your Design:

  1. Draw the Design
    Use chalk to sketch out the design on the planter. If you’d like, you can download a printable template to make it easier.
  2. Paint the Design
    Start filling in the design with your paint. Begin from the outer edges and work inward. Allow the paint to dry completely before adding any additional layers if necessary.
  3. Optional: Seal the Design
    To protect the painted design from dirt and scratches, you can finish with a spray acrylic sealer. This will help your artwork last longer and look fresh!

There you have it—two simple ways to create a stunning abstract architecture planter for your home. Whether you use a Cricut or paint by hand, this project is an easy way to update your planters and make your plants even more beautiful. Happy crafting!

Leave a Reply

Your email address will not be published. Required fields are marked *