Transforming a Laundry Closet: My Favorite Space in the House
- September 22, 2024
- 0
When we moved into our new home, one of the first things we did was replace all the appliances, including the washer and dryer. The old units were
When we moved into our new home, one of the first things we did was replace all the appliances, including the washer and dryer. The old units were

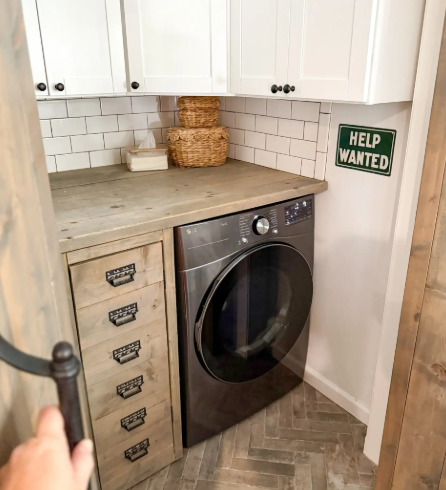
When we moved into our new home, one of the first things we did was replace all the appliances, including the washer and dryer. The old units were over a decade old, and I was thrilled to finally get front-loaders after years of dealing with top-loaders that would rip my clothes. However, we quickly realized that the extra bulge of the front-loaders made it impossible to close the laundry closet doors. At first, this seemed like a disaster, but it turned out to be a blessing in disguise. Without the doors, I was inspired to redesign the space into something functional and aesthetically pleasing—especially since it’s right next to our kitchen. Now, it’s my favorite “room” in the house!
I’ll break down the materials and tools used below, but here’s a quick overview of the tools I relied on for this project:
Tools Needed:
Materials Needed:
Estimated Cost: $155
Estimated Time: 2 days (including drying time)
The folding countertop was the most challenging part, but it was also incredibly satisfying to build. The closet itself was far from square, with every wall at a different angle, so we had to carefully measure everything. After installing the 2×4 support braces along each side of the closet, we attached the plywood using wood glue. To save money, I used a cheaper plywood piece for the base and a finished one on top since the top would be the only visible part. Once everything was glued and clamped into place, we measured the wonky dimensions of the closet and carefully cut the plywood to fit.
To accommodate the water lines, we used a jigsaw to make cuts in the countertop for the pipes. The great thing about linen front-loaders is that the waterlines should stay at counter height, so we couldn’t relocate them. After everything was cut and fit, I added plywood edging to match the rest of the wood in the room. For the finish, I painted the wood with leftover wall paint and used a foam roller for a smooth, bubble-free coat.
Materials Needed:
Estimated Cost: $150
Estimated Time: 3 days (including drying time)
The ledge shelf was a more straightforward task. After installing the support braces, I cut the plywood to fit the length of the closet and used dowel joinery to join the two pieces together. I reinforced this with wood glue for extra strength. For the finish, I used a faux white oak treatment to match the overall aesthetic. Then, I painted the bottom of the ledge white, following the same technique used for the countertop. Once everything dried, we carefully placed the shelf into position.
The ledge shelf serves as a functional storage space, hiding the water lines while providing extra room for detergent and other laundry essentials. It also doubles as a space for decorative items like a vase and catch-all for loose change or jewelry.
Materials Needed:
Estimated Cost: $35
Estimated Time: 2 days (including drying time)
The wood shelves were the easiest part of the makeover. I simply cut the plywood to match the brackets’ depth and length, applied the same faux wood treatment, and installed them with wall anchors. This addition added both functionality and a polished look to the laundry closet.
To maximize functionality, I wanted to incorporate a retractable clothesline into the space. This would allow me to hang clothes to dry just like I did with the old wire shelf. The retractable clothesline was easy to install and works perfectly, even for my longest garments like jumpsuits. It locks into place for tension and retracts slowly, making it convenient to use without risk of snapping the line.
I also repurposed some decorative items from around the house, like a vase and a small wood bowl for dryer balls. These small touches make the space feel both functional and aesthetically pleasing.
The best part about this makeover is how much more organized and visually appealing the laundry closet has become. Now, instead of being a space I dread, it’s a spot I genuinely enjoy. The folding countertop, hidden water lines, and additional shelves all contribute to making the laundry process a bit more pleasant—and I’m happy to say I now have a functional and beautiful space to work in!